Mixed Media Scrapbooking page
In this post, I will show you how to do a simple mixed-media scrapbooking page with a video tutorial. I will also show you alternative mediums to use should you not have the right equipment. These ideas show how to combine mixed media in your scrapbooking pages with ease, and you can adapt this to any paper layout you want. Using paint and other media is great fun; it is all a process of playing with colour and texture and having fun!
I could be compensated, if you click on a link in this post via a cash payment, gift or something else of value for writing this post. See our full disclosure policy and privacy policy for more details.
This post may contain affiliate links, which means we may receive a commission if you click a link and purchase something that we have recommended at no extra cost to yourself. As an amazon associate, we earn from qualifying purchases.
How to do a simple mixed media scrapbooking page: watch this video tutorial
Distress oxides and inks used in this video were;
- Tattered rose distress oxide pad
- Fossilised amber distress oxide pad
- Abandoned coral distress oxide pad
- Ranger Archival black ink pad
What is Mixed media scrapbooking?
What is a mixed-media scrapbook layout? Mixed-media scrapbooking is the art of combining mixed-media art and memory scrapbooking. Scrapbooking is a paper craft hobby that documents photos and memories. Mixed-media is an art form that combines more than one medium or material, such as paint, texture paste, sprays, and modelling pastes.

How to make a mixed media scrapbook layout
There are many layers to a mixed-media scrapbook layout and many ways to do it. The art is to be creative and let your imagination run wild. There are no hard-and-fast rules when it comes to mixed-media, but there are many techniques you can learn. We will cover just a few here to start you on your journey.
Check out these Free Scrapbooking Cut Files here!
Step by step mixed media scrapbook page instructions
Where do you start when doing a mixed-media scrapbook page? These tips with give you ideas on what to put on your scrapbook page and get creative. Use these basic steps to create a fun altered art scrapbook page.
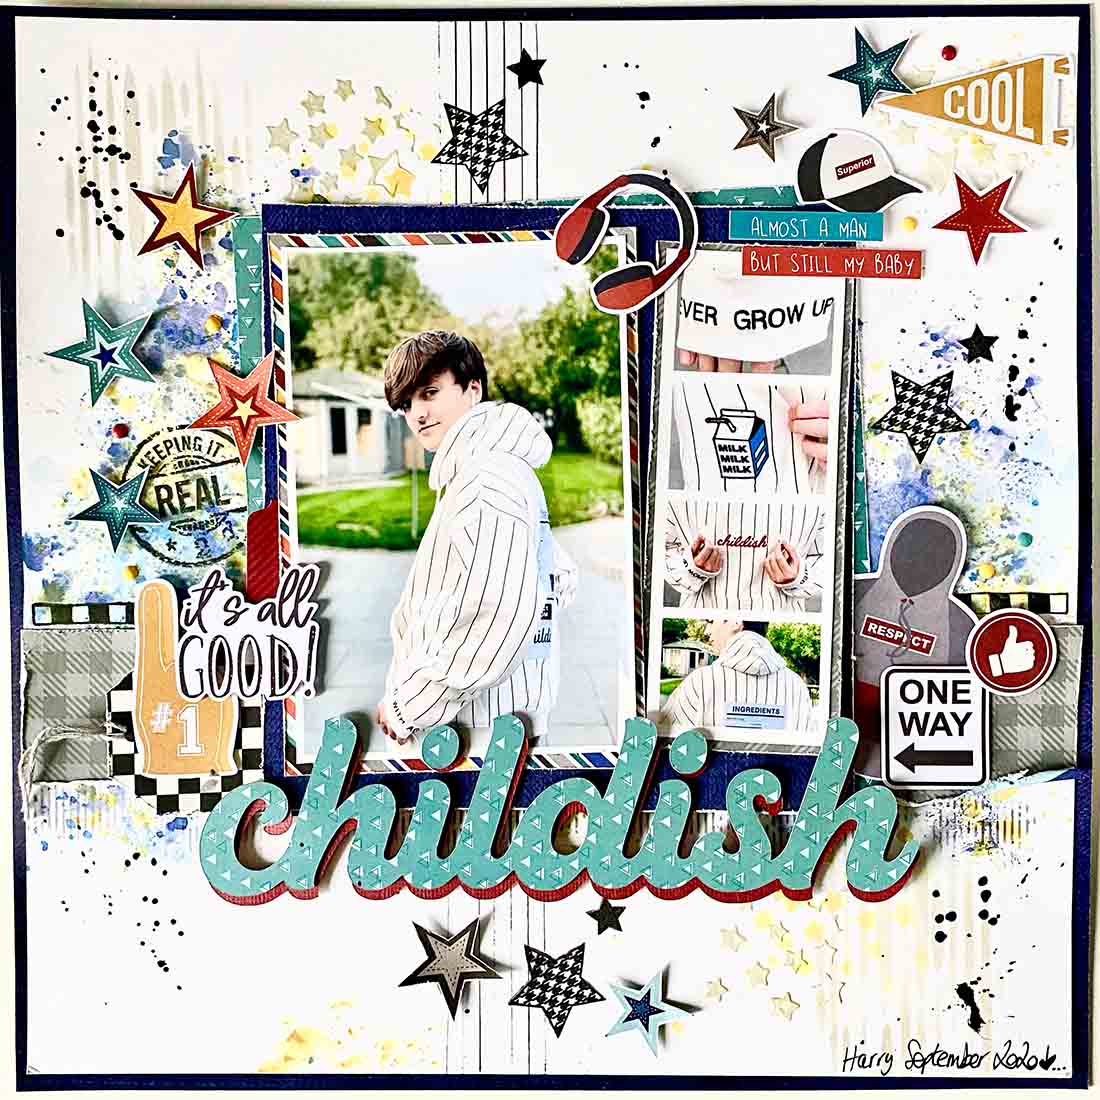
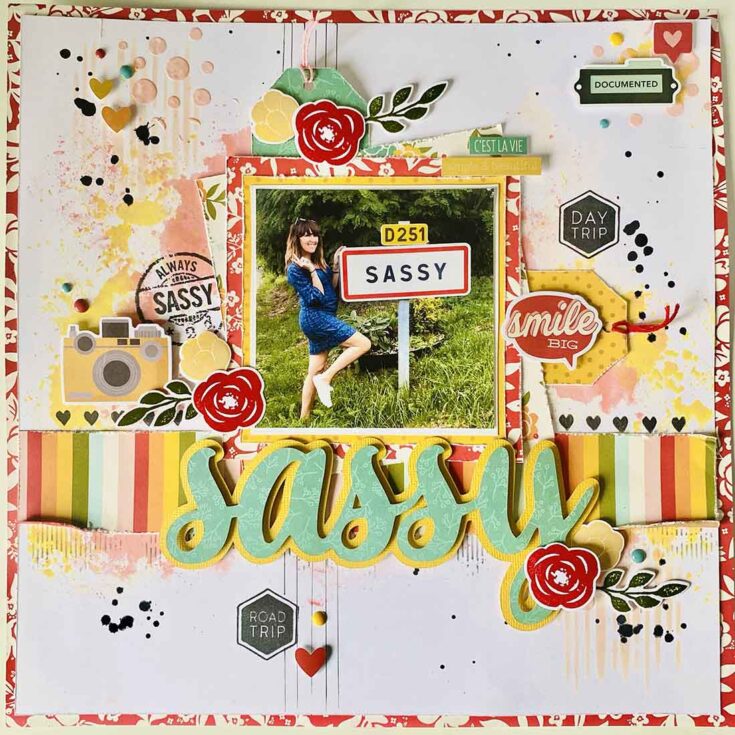
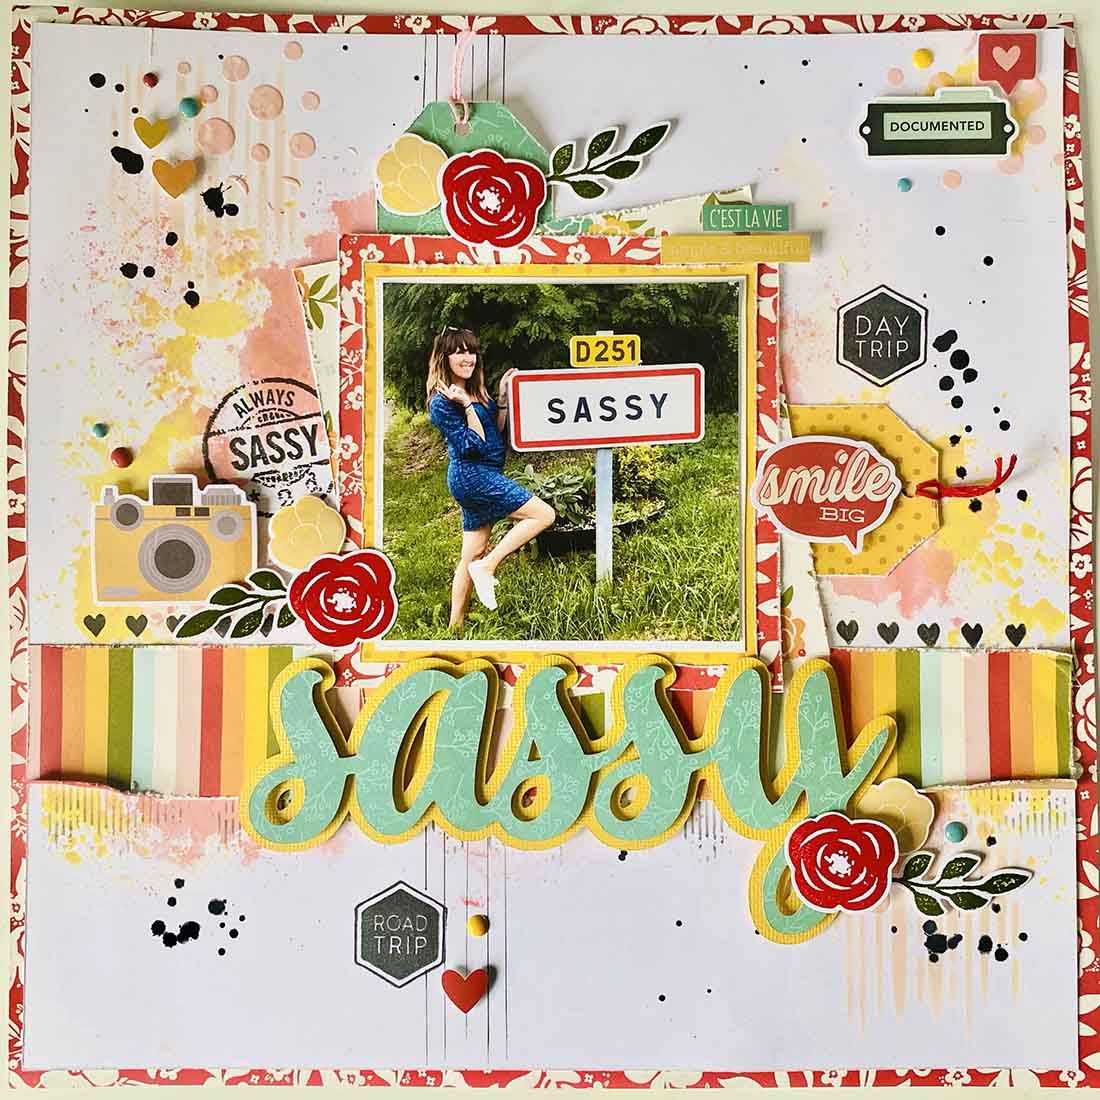
These are the instructions to two scrapbook pages that I created in the same way using different colours and stamps. Where I used stars on the boys page I used flowers on the girls page. I changed the colour schemes on both pages.

Step one! Choose mixed media-based card stock.
You will need a reasonably thick card stock as your base or you will need to coat your base using some gesso to stop the paper absorbing too much water or media.
Look for card of around 300 gsm. Bear in mind this may still warp if you use too much water. You can also use thick watercolour paper look for A3 size if you wish to do a 12 x 12 page. I love this white 12 x 12 card from Anne Marie designs.
Gesso can be used as a primer on your card. It prevents paint from soaking into your scrapbooking card. It will also strengthen the paper so that you can apply lots of layers and prevent warping.
Step two: choose any patterned paper
Choose some patterned paper to mount your photo or create a design on your page. Mount any photos and decide where you are going to have your patterned paper on your background. I also made some tags to use on my page too. Mark where this is with a pencil so you can create your background around it.
Step three: distress card stock edges
If you are using card or patterned paper, you may want to distress any edges to add texture to the page. Use the edge of a pair of scissors to rough up the edges of the paper.
Step Four: Add colour to your page.
Add colour to your page with either watercolour paint or a stamp pad. Using the smooshing or packaging technique you can apply small amounts of colour without saturating the page. Alternatively paint directly on to the page with acrylics or watercolour.
How to do the packaging technique
To do the packaging technique you need some leftover plastic packaging such cellophane. Apply paint or a stamp ink block to the packaging and spritz with water. Using another piece of packaging transfer the colour over to the card stock until you get the effect. If you get any pool of water use some kitchen towel to blot any access.
Step five, colour and texture with stencils and paste
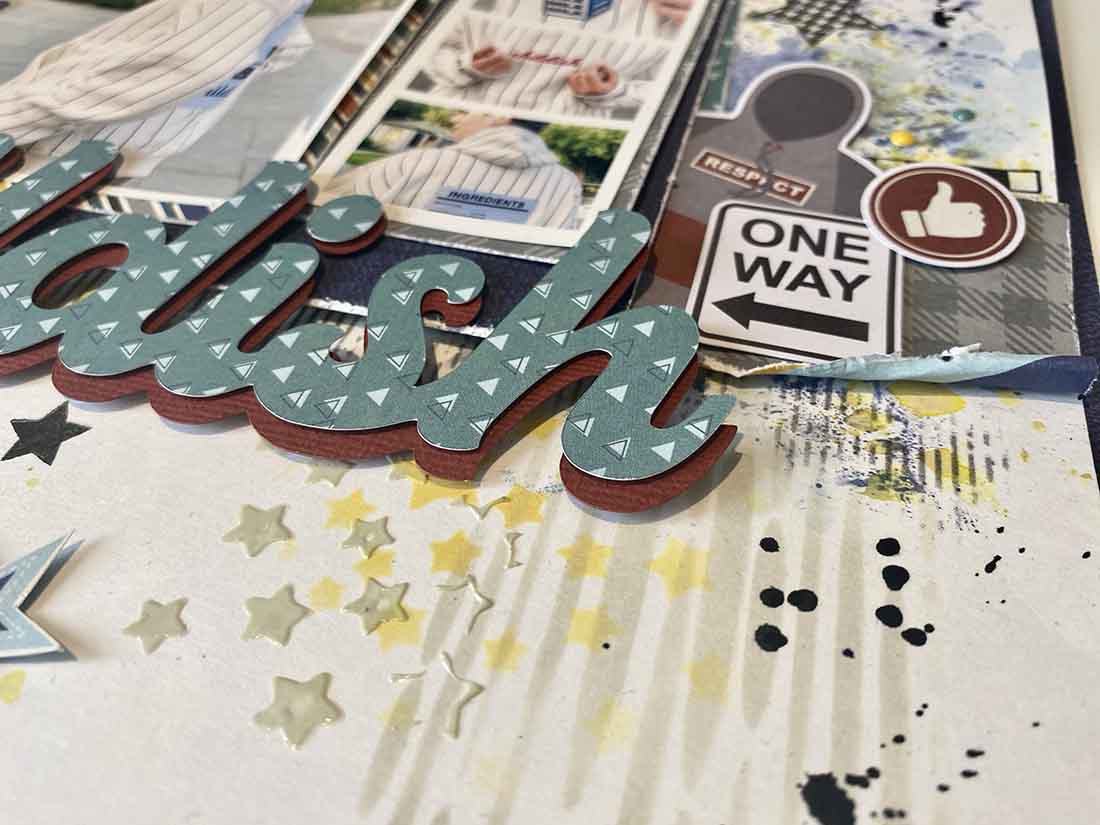
Use stencils with a variety of mediums to add dimension to your page. Use a stencil and an ink blending pad to apply soft colour to your page. For added dimension, use a stencil with texture paste, modelling paste or even nuvo dots. I used three stencils here: stars, thick stripes, and mini stripes in four different colours.
Mediums you can use with stencils
- Acrylic paint
- Stamp pads
- Modelling paste
- Texture paste
- Nuvo dots
You can colour plain texture paste with, watercolour, gelatos or inks.
Step six: stamp accents directly onto your mixed media page
Use acrylic stamps to stamp directly on to the page. If you are using wet watercolour you will need to make sure that you stamp pad is waterproof and permanent so that is does not bleed in to the watercolour or run. You can try Ranger Jet Black Archival Ink Pad or Black Stazon ink pad. You can also get these stamps in a range of colours but black is a good place to start.
Step seven: make extra embellishments using stamps and ink
Stamp extra images using ink pads for extra embellishments on the page. On the Sassy page I stamped some extra flowers and cut them out. I used the Altnew mini floral elements stamps and die set.

Step eight, splatter with ink or watercolour
There are different ways to splatter on a scrapbook layout. Add splatters of colour to your mixed media scrapbooking page using watercolour paint or calligraphy ink. You can also splatter in various colours including metallics and white ink. You can also splatter with Distress spray stains, to add large splats take the lid off of the bottle and tap the top for larger splats. Some ink paint pens will splat too if you shake them such as posca pens.
Step nine: arrange your page, adding extra embellishments.
Wait for your background mixed media to dry before mounting your photo and papers on your background sheet. Cut out a font on a cutting machine such as a Silhouette Cameo or Cricut. or use thicker alpha stickers instead. I like to add my extra bits of ephemera and stick them on using foam pads to add dimension.
Print this How-to card below!
How to do a simple mixed media scrapbooking page
How to do a simple mixed media scrapbooking page with a video tutorial. I will also show you alternative mediums to use should you not have the right equipment. These ideas show how to combine mixed media in your scrapbooking pages with ease and you can adapt this to any paper layout you want.
Materials
- Paper
- card
Tools
- Scissors
- stamping ink, ink or paint
- Stencils
- Stamps
- Texture paste
Instructions
- Step one! choose mixed media base card stock.
You will need a reasonably thick card stock as your base or you will need to coat your base using some gesso to stop the paper absorbing too much water or media.
Look for card of around 300 gsm. Bear in mind this may still warp if you use too much water. You can also use thick watercolour paper look for A3 size if you wish to do a 12 x 12 page. I love this white 12 x 12 card from Anne Marie designs.
Gesso can be used as a primer on your card. It prevents paint from soaking into your scrapbooking card. It will also strengthen the paper so that you can apply lots of layers and prevent warping. - Step two choose any patterned paper Choose some patterned paper to mount your photo or create a design on your page. Mount any photos and decide where you are going to have your patterned paper on your background. I also made some tags to use on my page too. Mark where this is with a pencil so you can create your background around it.
- Step three distress card stock edges If you are using card or patterned paper you may want to distress any edges for added texture on the page. Use the edge of a pair of scissors to rough up the edges of the paper.
- Step Four, Add colour to your page Add colour to your page with either watercolour paint or a stamp pad. Using the smooshing or packaging technique you can apply small amounts of colour without saturating the page. Alternatively paint directly on to the page with acrylics or watercolour. How to do the packaging technique,
To do the packaging technique you need some leftover plastic packaging such cellophane. Apply paint or a stamp ink block to the packaging and spritz with water. Using another piece of packaging transfer the colour over to the card stock until you get the effect. If you get any pool of water use some kitchen towel to blot any access. - Step five, colour and texture with stencils and paste Use stencils with a variety of mediums to create added dimension on your page. Use a stencil and an ink blending pad to apply soft colour to your page. For added dimension use a stencil with texture paste, modelling paste or even nuvo dots. I used three stencils here, stars, thick stripes and mini stripes with four different colours.
- Step six, stamp accents directly on to your mixed media page Use acrylic stamps to stamp directly on to the page. If you are using wet watercolour you will need to make sure that you stamp pad is waterproof and permanent so that is does not bleed in to the watercolour or run. You can try Ranger Jet Black Archival Ink Pad or Black Stazon ink pad. You can also get these stamps in a range of colours but black is a good place to start.
- Step seven, make extra embellishments using stamps and ink Stamp extra images using ink pads for extra embellishments on the page. On the Sassy page I stamped some extra flowers and cut them out. I used the Altnew mini floral elements stamps and die set.
- Step eight, splatter with ink or watercolour
There are different ways to splatter on a scrapbook layout. Add splatters of colour to your mixed media scrapbooking page using watercolour paint or calligraphy ink. You can also splatter in various colours including metallics and white ink. You can also splatter with Distress spray stains, to add large splats take the lid off of the bottle and tap the top for larger splats. Some ink paint pens will splat too if you shake them such as posca pens. - Step nine, arrange your page adding extra embellishments. Wait for your background mixed media to dry before mounting your photo and papers on your background sheet. Cut out a font on a cutting machine such as a Silhouette Cameo or Cricut. or use thicker alpha stickers instead. I like to add my extra bits of ephemera and stick them on using foam pads to add dimension.
Thank you for reading, How to do a simple mixed media scrapbooking page with video tutorial. I hope you enjoy making your own page.